This isn’t actually a food blog… but it is a “I signed up to bring 2 halloween desserts on the sign up genius… oh shit” blog- so let’s go 😂 This is the real and true behind the scenes and probably 80% more than you bargained for. Just keep reading, it gets… interesting. – Jenna
First up- super easy and super cute. Kind of time intensive adding the pretzels on, but you could use icing for that instead of the pretzels. I present- spider cupcake toppers.
You’ll need a pack of chocolate sandwich cookies (we love Newman Os!), skinny pretzel sticks, candy eyeballs (see below for that journey!), and a little icing to stick them on (I just mixed powder sugar and water for a quick icing that hardens well). Oh, and the cupcakes of course. You could add these to store bought cupcakes, or I like this recipe from Sally’s Baking Addiction (and her buttercream). Listen and double listen when she says to fill the cupcake liners half way full!! They turn out the perfect height.
You can make your “spiders” while the cupcakes bake and cool. Break the pretzel sticks in half- you need 8 halves for each cookie (the spider legs). The first thing I tried to do was stick the pretzels right into the cookie cream, between the top and bottom cookies. That was okay but depending on the pretzels you get, it can be hard going because they’re a little thicker than that space. I ended up twisting the cookies apart so that I had just one cookie and the cream, instead of the two cookies of the sandwich. Swirl the ends of the pretzel legs into the quick icing before you stick them in the cream and they’ll stay together fine. Let those dry, then add 2 candy eyeball eyes to the cookie side. These are kind of a pain to put on because they’re tiny tbh, but it’s the most important detail so you kinda have to get thru it. Wash off your craft tweezers. Haha. That’s your spider! Spooky!
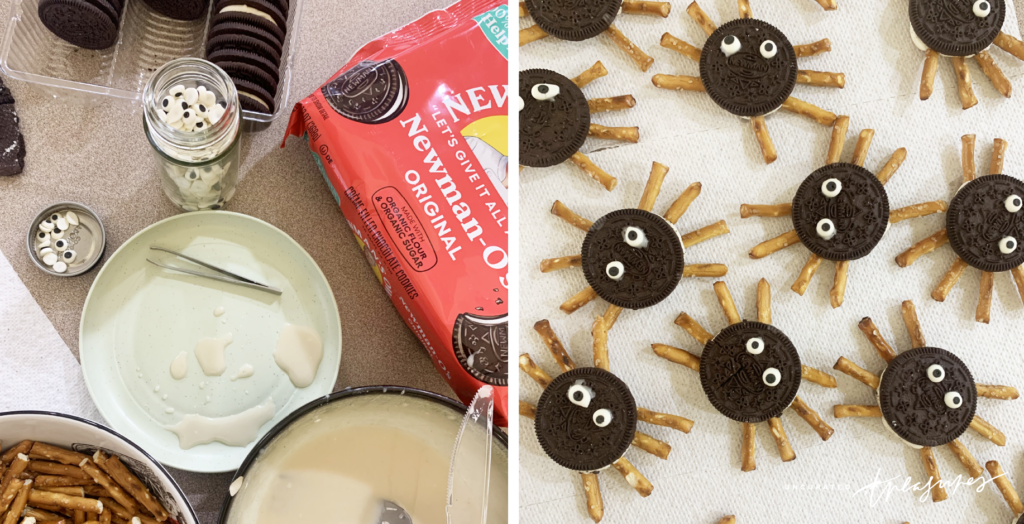
Frost the cupcakes (I hadn’t tried these before but a piping bag and tips actually make this 100% times quicker and easier once you get the hang of it- sometimes those occupation delusion Amazon purchases do come in handy! Haha) and add a spider topper to each one. Something to note- these are kind of hard to plate and transport because they can’t be too close together (because of the legs), so choose a platter/container that’s bigger than you think you need.
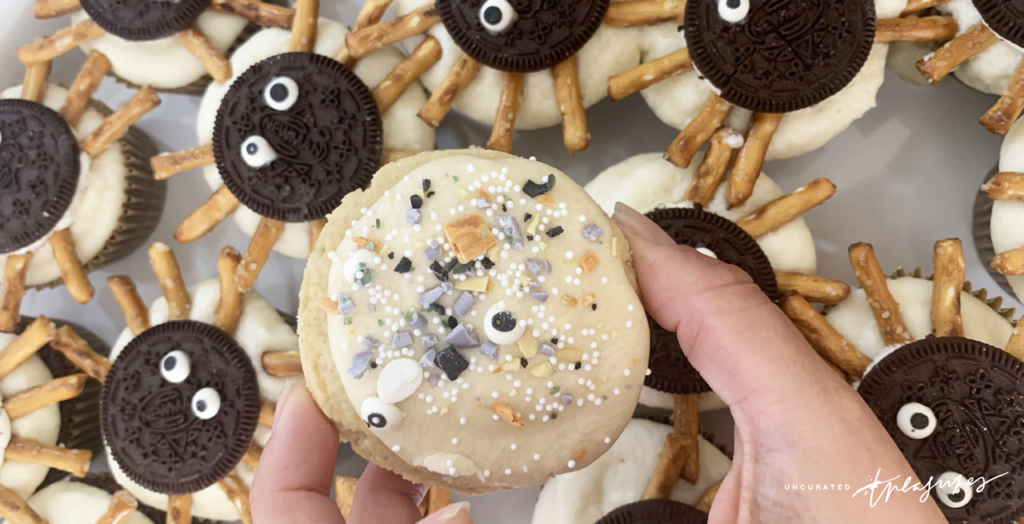
For the second dessert– I will never miss an opportunity to make copycat Crumbl cookies. So stinkin’ good. The sugar cookie recipe from Modern Crumb is freaking amazingggg (just leave the icing white instead of pink) or you could use Cooking with Karli’s waffle cookie recipe– spread the icing out on top of the cookie and skip the syrup to make it less messy. 10/10, highly recommend either one!! What’s making them a “Halloween dessert,” you ask? It’s the sprinkles of course!
Here’s where things take a turn. I know we’re all new around here, but everyone will learn quick- it wouldn’t be Uncurated Treasures™ without some unnecessary degrees of difficulty or you know, wasting 10000 amps of brainpower on a party dessert assignment. So this is what happened next:
Homemade sprinkles. And candy eyeballs. In case you were wondering, no. I am not a baker.
I KNOW. Everyone I told about this LOLed (including me) (more than once). I’m laughing again typing it.
For everyone else, this sprinkle mix from Target is adorable and what I was going for. For the folks that have some extra time and get a lil worked up about food dyes and GMOs in your food… keeping in mind that, allergies aside, this is all for a literal sprinkle of sprinkles per cookie- let’s go on an adventure, shall we?
To start, you’ll need to make royal icing- I used this recipe from Preppy Kitchen because it didn’t need meringue powder. Line three large cookie sheets with parchment paper- one for your eyeballs, and two for your stick sprinkles. You don’t need to make that many of either type, but the icing recipe will be enough for that many. I wasn’t planning ahead on how much it would make, but I did 24 spiders with the candy eyeballs and 24 cookies with the sprinkle mix and we have PLENTY left over. Yippee?
For a Halloween mix, you’ll need to portion out and dye the following icing colors:
- white- this is the plain royal icing.
- black- I used a bit of activated charcoal powder and it worked perfectly (we keep this on hand for tummy bugs anyway).
- purple- the “red” from the Watkins natural food dye set (see below) is actually… light purple so you can use that.
- orange- here’s where that purple “red” becomes a problem. I ended up using turmeric powder for a pretty light orange but my oldest said that they tasted like turmeric. I honestly do not know how he knows what turmeric by itself tastes like, but he definitely has my dad’s super tastebuds. Haha.
- green- blue and yellow dye, about 3 drops yellow to 1 drop blue. By now you’ll see that the natural colors aren’t as vibrant as conventional food coloring so the green is a pastel, but it’s fine. One of my kiddos ended up darkening up half of this later which I also used but I don’t know how he did it. It looks good, a nice deeper green. Play around with it!
A note on natural food coloring: In hindsight (and where I hope this play by play is a little helpful!), I should have done some research on natural food dyes before this little project. The Watkins set is accessible and affordable, but maybe not the best when you’re looking for specific or vibrant colors. After the fact, I found this GREAT breakdown of several brands from Sleeping Makes Me Hungry- there are definitely some recommendations here I’ll use for next time!
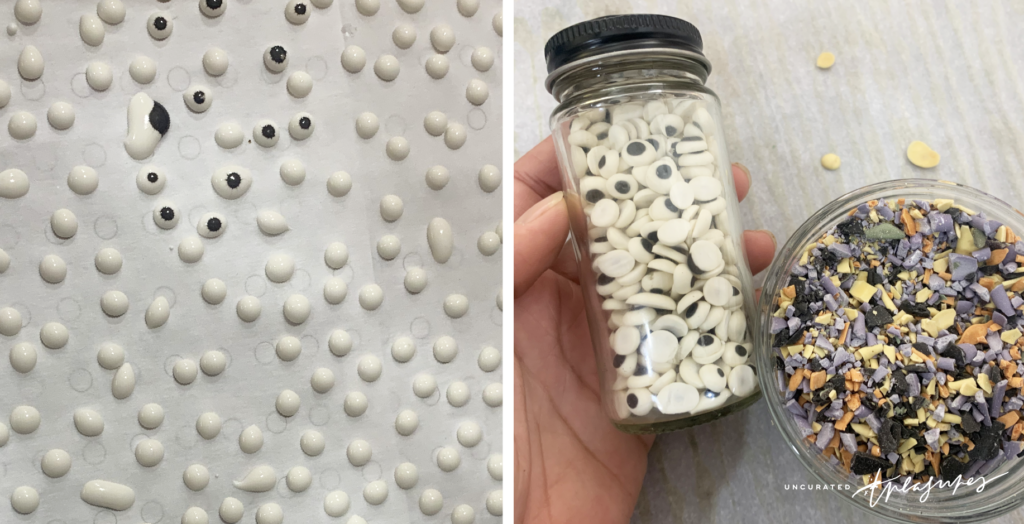
For the eyeballs, I figured I would do a small circle of plain white icing, and then add on the black icing eyeballs. Best laid plans! I had made the royal icing a bit too thin I guess, and instead of being able to pipe out icing in any kind of controlled way- I ended up basically dripping icing drops across the parchment paper instead. Worked out, but this is where my visions of being a pro cookie decorator crashed and burned hard. Hahaha. If you have better luck the first time- or maybe actually know what you’re doing?- here is a template I (optimistically?) made for .25″ inch circles (the eyes). Print 2 copies of it for 1 large cookie sheet and lay them under the parchment paper to use as your guide. Get the white circles down first, let them harden for a bit (15 minutes or so), and then dot the black icing in the (approximate) center of each one with a toothpick. There is a trick here to the layering of putting the black on- but don’t ask me what it is, I’m not a baker! All I know is, if you do it when the white is too wet, the black will bleed into the white a bit (sort of a bloodshot eye look, but it’s black). On the other hand, some of the eyes dried with a hole in the middle of the black, which apparently can be from the white being too dry- I took it as a pupil haha and moved on. This is why people buy these from Target!!
For the stick sprinkles, you’re going to pipe out thin strips of each of your colored icings (black, purple, orange, and green), filling your 2 cookie sheets. It’s ok if it’s not a consistent line, you’re chopping them up later. What you’re going for in diameter is similar to the classic rainbow sprinkles you’ve probably had on ice cream. The finished product will be much, much more… rustic than that but let’s keep up the good intentions.
Both the candy eyeballs and the sprinkle lines need to completely dry overnight. After they’re dry, use a sharp kitchen knife to chop the lines into the shorter sprinkle pieces. This is not an exact science 😂 Set aside the candy eyes for your spiders. You can mix your colored sprinkles together in a container for now (I also mixed in some white non-pareil sprinkles from Whole Foods for a different texture), and then add the extra candy eyeballs in to the sprinkle mix once you’ve finished the spider cupcake toppers. Use the sprinkle mix on your freshly iced cookies and enjoy!
I’m supposed to bring a “fun Halloween” drink for 30 kids in at the end of the month, follow us for more tips! Thank you.